Building a Soil Moisture Sensor in TinyGo with Arduino
Posted on May 6, 2025 • 4 minutes • 773 words
This project uses these versions of languages, frameworks, and libraries.
-
 go: tinygo 0.37.0
This tutorial may work with newer versions and possibly older versions, but has only been tested on the versions mentioned above.
Building a Soil Moisture Sensor in TinyGo with Arduino
If you're a Go developer and want to dip your toes into the world of hardware, I’ve got good news: you can absolutely build cool stuff—like a soil moisture sensor—without switching to C or C++. Thanks to TinyGo , you can write Go code for microcontrollers like the Arduino. And yes, it’s as fun and straightforward as it sounds.
In this post, I’ll walk you through building a soil moisture sensor that reads data and displays it on an LCD screen—all written in Go using TinyGo.
This post is available as an in-depth video tutorial too! Check it out here:
Why TinyGo?
Microcontroller development is traditionally done in C or C++, but for many of us who love Go, this can feel like stepping back in time. TinyGo changes the game by compiling Go programs to run on small devices. It supports a growing number of microcontrollers and comes with a solid standard library for embedded development.
If you're already familiar with Go, this gives you a huge head start. You get familiar syntax, strong typing, and tooling you already know how to use.
What You’ll Need
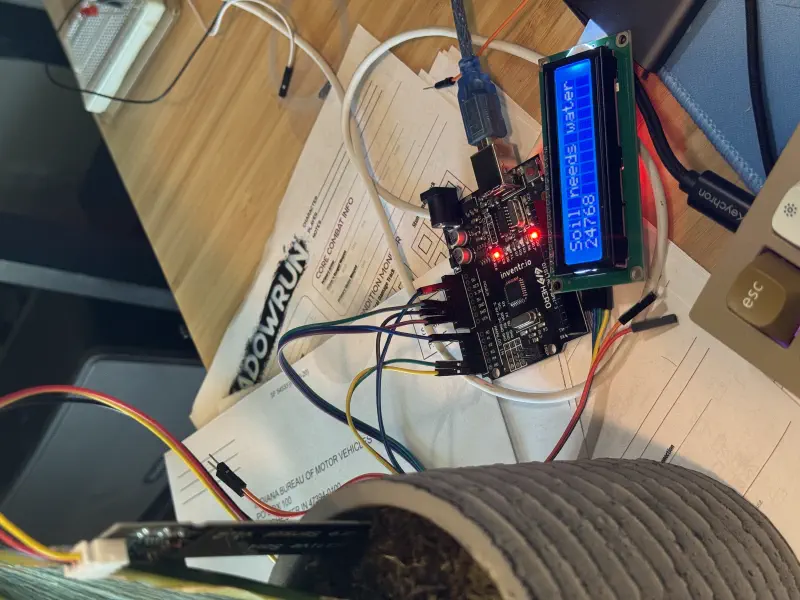
Here’s the hardware setup I used:
- Inventr.io HERO board (Any Arduino-like will work, though you may need to find a second 5v)
- Capacitive Soil Moisture Sensor
- I2C 16x2 LCD display
- jumper wires
- USB cable for flashing
Software:
- TinyGo v0.37.0
- avrdude for flashing your compiled binary
- Go toolchain (TinyGo uses parts of it)
Wiring It Up

To help you visualize the connections, here's an overview:
Arduino <=> LCD
GND <----> GND
+5V <----> VCC
SDA <----> A4
SCL <----> A5

Arduino <=> Soil Moisture Sensor
AOUT <----> A0
VCC <-----> 5V
GND <-----> GND
Project Setup
Create a new directory to hold your code. In that directory, run go mod init and go get tinygo.org/x/drivers/hd44780i2c.
I'm going to shar eall the source code here, but I'll highlight some key pieces in just a second. For now, read through it all.
Source Code
package main

import (
	"machine"
	"strconv"
	"time"

	"tinygo.org/x/drivers/hd44780i2c"
)

const led = machine.LED

func main() {
	println("Hello, TinyGo")
	machine.InitADC()

	i2c := machine.I2C0
	err := i2c.Configure(machine.I2CConfig{})
	if err != nil {
		println("could not configure I2C:", err)
		return
	}

	lcd := hd44780i2c.New(machine.I2C0, 0x27)
	lcd.Configure(hd44780i2c.Config{
		Width:  16,
		Height: 2,
	})

	sensor := machine.ADC{machine.ADC0}
	sensor.Configure(machine.ADCConfig{})

	for {
		val := sensor.Get()
		lcd.ClearDisplay()
		if val < 16500 {
			lcd.Print([]byte("Soil is fine\n" + strconv.Itoa(int(val))))
		} else {
			lcd.Print([]byte("Soil needs water\n" + strconv.Itoa(int(val))))
		}
		time.Sleep(time.Millisecond * 1000)
	}
}
Breaking the Code Apart
We're going to use this section to step through the interesting blocks of code piece by piece.
machine.InitADC()
This line initializes the analog to digital converter. If you're using Analog pins, you're going to want to initialize this.
  i2c := machine.I2C0
	err := i2c.Configure(machine.I2CConfig{})
	if err != nil {
		println("could not configure I2C:", err)
		return
	}

	lcd := hd44780i2c.New(machine.I2C0, 0x27)
	lcd.Configure(hd44780i2c.Config{
		Width:  16,
		Height: 2,
	})
This block of code gets a handle on the I2C0 layer, configures that layer using default values and then passes the I2C0 to our hd44780i2c library. I2C is short for "Inter-integrated circuit" and includes the SDA and SCL ports. SDA is short for Serial Data and SCL is short for Serial Clock. You can find more information on I2C, SDA, and SCL here , but for now, you know everything you need to continue this tutorial.
sensor := machine.ADC{machine.ADC0}
sensor.Configure(machine.ADCConfig{})
These lines configure a reference to our sensor, which is plugged into the ADC0 PIN. We'll recieve data over this pin on an interval and act on this data in just a moment.
  for {
		val := sensor.Get()
		lcd.ClearDisplay()
		if val < 16500 {
			lcd.Print([]byte("Soil is fine\n" + strconv.Itoa(int(val))))
		} else {
			lcd.Print([]byte("Soil needs water\n" + strconv.Itoa(int(val))))
		}
		time.Sleep(time.Millisecond * 1000)
	}
And here's that moment! We're setting up a for loop that runs indefinitely (as long as the machine is powered on). In this loop, we're getting a reading from our sensor and then we're clearing the connected LCD display. Again, the hd44780i2c library makes short work of this for us. Then, we check if the value is lower than 16500 (an arbitrary number that I picked based on a sensor reading after dipping my sensor partially in a cup of water) -- if it is lower, than we print to the LCD screen including the current sensor value. The line break ensures that the sensor reading is placed on the second line of our LCD.
The else condition is more-or-less the same, we just change the message that is printed. Finally, we sleep for 1 second and then let the for loop repeat.